the hem
Sarah at Advancing the Plot asked for some finished object shots of the hem. I'm going to try to oblige! Here's the inside of one of the fronts:
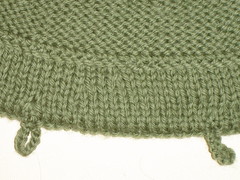
Click on the picture; it will take you to the flickr page, in which I made some Notes that will hopefully help you dissect the shot. I didn't knit this hem down as I went--I followed the pattern, and cast off when I came to the end, then sewed it down. I knew that with the curved edge, I would find it tricky to get the placement exact when wrestling with two needles! So what I did was determine that I wanted the cast-off edge to sit exactly 11 rows from the turn. I counted purl bumps and marked the 11th bump all along the edge using some blue scrap cotton yarn. This gave me a clear path to follow. (You could probably use this method if you wanted to knit it down, too.)
Then I just went for it! I threaded a needle, caught it through one side of a cast-off stitch, and picked the purl bump up. Then into the next cast-off stitch, etc., on down the line. It wasn't the speediest work, but it got really easy as I went.
Here's a shot of the knitted-in hem at the bottom of the back.
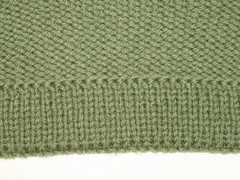
I've mentioned in a few comments the way I went about this: I did a normal old long-tail cast-on, and on the 10th row (10th, right? Whichever is the knit row after matching the distance before the hem) I folded the hem up, stuck the needle through the live stitch and also through one side of the cast-on. I basically did a k2tog with these two "stitches." Simple, clean.
Hope this is helpful!
posted by Mintyfresh @ 8:59 PM
4 comments
![]()


4 Comments:
Oh, I hope mine looks this good when I'm done!
That looks incredibly neat! Thanks for the tips :)
Thank you for the details!
Any tips for the back neck?
This is really helpful, thanks so much.
Post a Comment
<< Home